The glucose test strip is the archetypal success story for point-of-care devices; at one point in their history their cost was less than five cents per sensor to manufacture and retailed at one dollar per sensor. These days the glucose sensor has almost become a commodity item, but the lessons learnt from the glucose sensor should not be ignored.
In this note we discuss how Zimmer and Peacock have dissected the glucose test strip and make this low cost technology available to our clients for the new analytes of interest.
The glucose test stip is a laminate device, built on top of a substrate which has been previously printed with conducting tracks. The materials and manufacturing techniques are taken from high volume industries, such as newspaper printing and so are intrinsically low cost and can be manufactured in volume.
The team at Zimmer and Peacock have a pre-defined roadmap that if followed will allow you to realise your diagnostic in the same low cost format as the glucose test strip, but for the analyte you are interested in. Follow the steps below to develop and have us manufacture your own medical diagnostic/biosensor based on the glucose test strip cost model.
Why are glucose test strips electrochemical and not optical?
The first thing to note about the glucose test strip is that they are all electrochemical sensors, as opposed to optical, SPR, quartz crystal etc. The reason comes down to robustness and cost, and we have listed some of the reasons below and contrasted with optical techniques.
- An electrochemical sensor works in opaques samples from milk, to soil, to whole blood, and in contrast with optical techniques it does not require cleaner/transparent samples. Therefore the sample preparation in an electrochemical device is so much easier/lower cost.
- Optical based sensors require optically transparent materials, whilst electrochemistry works on paper, skin, plastic, ceramic, wood etc. As long as the material is non-conducting and a conducting material can be adhered onto it then you can make an electrochemical sensor from it.
- An optical sensor requires a way of blocking the natural light from the sensor, whilst an electrochemical sensor operates perfectly well in natural daylight. The extra cost of shielding an optically based sensor can be the difference between you winning the market versus your competitor taking the market with their electrochemical equivalent product.
- The circuit to drive an electrochemical sensor is much less expensive than it's optical equivalent and requires absolutely no optics to interact with the sample.
STEP ONE – The first step in any biosensor development programme is quite manual, i.e. you are hand making sensors and hand testing sensors; therefore you need a sensor that is big enough to be manipulated with hand held lab ‘tools’, therefore Zimmer and Peacock has a number of sensors where the electrodes are large enough to handled and solutions can be pipetted onto them. In the first instance Zimmer and Peacock will advise you on a sensor geometry and material that is best for your assay.
Along with the sensor we will recommend a jig to hold the sensor correctly, firmly and to ensure good electrical contact. The summary is if you don’t have a nice way of performing your experiment then you won’t get good data.
Lastly we will recommend our Ana Pot reader, whose small size is ideal both for lab work and for putting in front of investors and clinicians.
We have put everything you need to complete STEP ONE in the Biosensors Developers Kit.

STEP TWO - In STEP TWO we have to transfer the assay from the electrode configuration in STEP ONE to the perpendicular electrode configuration.
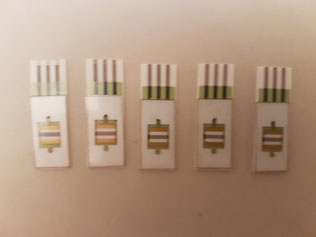
When you look at the images of glucose strips they don’t have circular electrodes, rather they often have perpendicular electrodes, and this is because the configuration allows the electrodes to act both as the sensing element for the analyte of interest but also as a fill sensor, i.e. when the sample is on the sensor it shorts the two electrodes together and this signal can be used to both know that a sample is present and to automatically starts the assay. Zimmer and Peacock deliberately have these configurations to mimic this property, please see the adjacent figures , and the video below.


STEP THREE - One of the final development steps is to create the capillary channel on the electrodes so that the sample, be it blood, urine, water etc can be guided onto the sensor. Again Zimmer and Peacock has standard kits for doing this.
If you have an ambition to develop and/or have us manufacture you a low cost medical diagnostic or biosensors please don't hesitate to contact us.